This tree, excluding the big mp4 files, can be cloned on your
system; then you could "git pull" for updates:
git clone git://hsw2020.gnudd.com/hsw2020-www.git
For each lesson, there are slides and/or videos, for the first part of the lesson, but the latter half is done in videoconferencing (Jitsi or Big Blue Button). So material here is around an hour worth (usually a little less) for every lesson.
The videos are 15-20m each. Specific length is listed here below for each of them. They are on Youtube, feel free to share the link, because I (almost) don't swear when I record myself. Please choose "720p" resolution when I show examples on the terminal or editor.
This is an introduction to the course. Slides are not published, as I consider them irrelevant. The video is both as a link to Youtube and the original file to download.
The first lesson is about git. Everything I do here is committed, either in the www tree (these pages and small exercises) or in the separate project.
I suggest to read an article I published in 2010, but it's still current. I translated it from Italian in a hurry, and it's horrible. I re-read and fixed the first half, I'll complete it sooner or later.
An Italian version of the same (much more polished in language) is on Linux.it in my ancient personal pages, but I have no access to them currently.
Then, three videos. Again, Youtube and original file.
We are using C language. If you want a book I suggest K&R, or you have more references at the end of my short document linked below.
We are not using floating point nor standard libraries and so on, because the target is microcontrollers. We use the linker massively, so even if you feel confident with C I suggest you take a look here.
For A-C-X and A-C-X-more there is an Italian version on Linux.it.
This lesson is about cross compilation, but it also includes a description of binutils and inline assembly. The example shows use of inline assembly, multi-arch stuff, weak functions and volatile.
There also is a package, with documentation, about making your own ARM toolchain for microcontrollers. I used it to build various versions, and it works. You can clone it here:
git clone git://hsw2020.gnudd.com/arm-toolchain.git
If you have TeX and Texinfo you can build the documentation
in doc/. The current pdf output is committed here in the
web pages too.
This is about kicad. It is not a tutorial, as many are there, but a quick overview and a list of things that I consider useful but are not usually described in tutorials.
Unfortunately, recording stopped one minute before the end, so tha last part is missing, but it's not very important, so I won't redo it all.
The second part is about the TDC (time to digital converter) device that we'll use during the course. I designed this at the end of 2018 for a conference, where I had two 45m slots, to discuss hardware and software. Recording of the conference were never published. I used the material at the "End Summer Camp" of 2019, where I shrunk the most important concepts in 28m. So this is the whole HSW2020 course in half an hour. The video is available, thanks to Federico Sgobbi and the rest of the ESC team. I spoke Italian because there were no foreign attendees at the conference.
The repository of the TDC is out there, but I'd better introduce things one at a time during the course. So there is a local repository, where hardware is commited right away (by cherry-picking from my other repo) and software will be added during the next lessons. Please pick a copy:
git clone git://hsw2020.gnudd.com/hsw2020.git
We are now moving to qemu-arm, in order to be able to run some code without the need for real hardware. These videos, with associated commits in the repository, perform this step. You can run the code on your PC, provided you install the cross-compilers and so on.
Code for hell-arm is in the hello subdir
of hsw2020-www, code for the versatile example is
in the versatile subdir of the same project.
As a reference for this initial approach to code, please consider reading the Thos document (Two Hour Operating System). Where these concepts are explained -- but Thos runs on real hardware, similar to the TDC, so some things will be introduced later on during the course. The thos repository is here:
git clone https://github.com/rubini/thos.git
There is also a boring video of me writing Thos. 90 minutes.
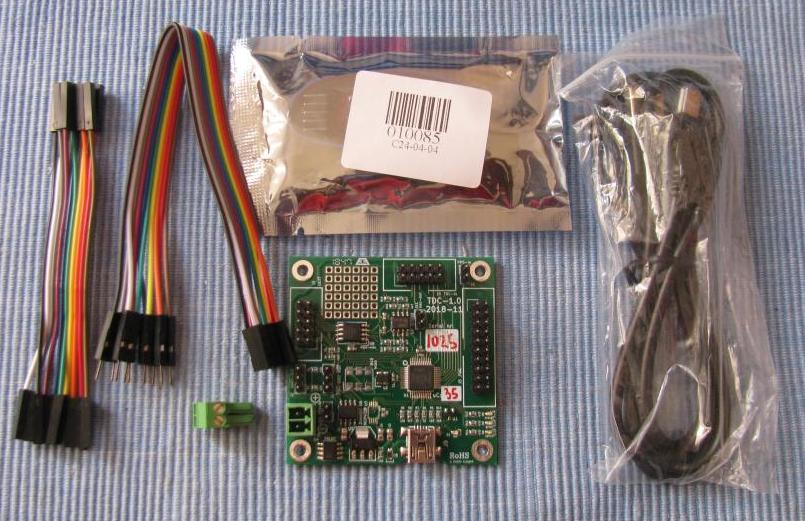
This is the TDC kit that we'll use during this course:
It includes:
The green connector says "12V", but anything from 5V upwards works. You may note that I use a 7805 to make 5V, and the component wants at least 7V. Fact is, 5V are enough, because the final uC voltage is still within allowed limits. In this case, we should sell it for 7-12V, but in lab we know 5-12V is ok. More than 12V risks exceeding the 7805 power budget, because I didn't design anything for heath dissipation.
Please note that if you power the board with the USB cable, it will enter USB-programming. We will use it, but later on. To use serial-programming you must power the device otherwise. If you can't feed the green connector with 5-12V, it's possible to power it through the serial adapter, using the 2-pin strip that lives near the green connector. Pin 1 (double-border) is GND, and there are - and + markers nearby, on the sikscreen.
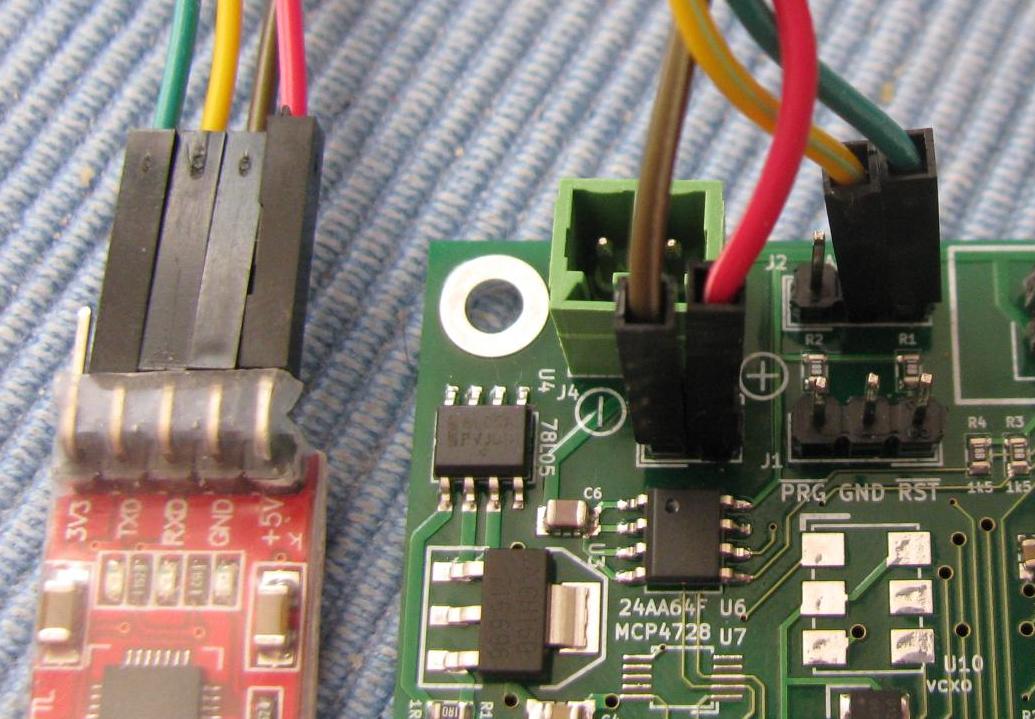
Please be careful about polarity. the positive goes to +, and negative (GND) to -. Otherwise you'll emit smoke (I didn't try, but I won't be surprised).
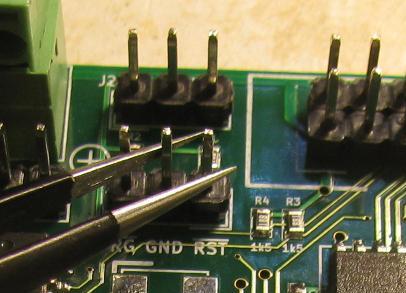
The UART pin-strip is GND-TX-RX, in this order. In the figure above we don't need to route GND to pin 1 of the UART connector, obviously. If in doubt pleas ask me. As a general rule, I always route GND to pin 1, because both 1 and GND are the ones that are never missing. The "PRG GND RST" strip is an exception, for mechanical reasons, as explained below. There, for clarity, all three pins names are marked on silk-screen.
The easiest way to force re-programming, is ticking RST low while keeping PRG shorted to GND, with your tweezers, as shown in the next figure, and this is why GND is the middle pin.
We now move to the real TDC device. We start with the hello program,
using the real hardware timer.
We load the program to RAM, because it is simpler
than loading to flash. The code structure (in the hsw2020
repository) is more complex than what I did in Thos, because I we'll
need to expand this code base. Thus, the final code layout is
already in place since
the first commits.
There are a few questions asked, as usual, because I want people to think about their code and their bugs. Please note that "program", in the tools directory means "prog-ram", as opposed to "prog-rom" (which programs to flash, or rom).
The next step is moving our code (the simple "hello" thing) to flash memory. This involves a little knowledge of the ARM processor and its peculiarity (in particular, the fact that Thumb code appears to live at odd addresses).
After learning a little of our CPU, we move to flash memory, writing a new linker script, a new boot.S and (unfortunately), also the code for UART initialization. When we run from RAM, we rely on the internal boot loader for setup of the serial port (which is used to upload code). When running from flash we are all alone and must deal with all fine details.
In the third video of this lesson, we activate the system PLL. to run the CPU at 48MHz, with the help of the external oscillator. The code is not especially interesting, what I'm interested in, as usual, is the underlying ideas and problems, not the implementation.
Finally, we add Kconfig to the software project, in order to be able to build for either Flash or RAM, choose our CPU frequency (sometimed you want it faster, sometimes you are more concerned about power consumption and want to run slower). Also, this allows to add optional features later on.
We are now adding the GPIO API to our system, and a GPIO example that is ticking the leds. The example is not described but is part of the repository. The GPIO subsystem is a basic block that must be simple to use and self-explanatory, without requiring the user to know register names.
Then printf, another basic building block that we can't live without. We pick an external printf, one that I wrote specifically for an embedded project that was in dire need for a good printf implementation (actually, it's not really mine, I got it from smarter people). What is especially interesting in pp_printf is that it is modular: you can choose at build time your tradeoff between features and size. We currently just pick the more featureful.
The printf video also deals with how to pick an external package in you own in the most maintainable way (short of using submodules, a more difficult topic we won't cover).
With this in place, we will find that all example programs became way too big (almost 4kB), and we'll be looking for the solution. This is not in a video, though: we discuss at lesson time and you will find the associated commits as last ones before the "lesson-08" tag.
Now we talk about processes. First a mimum of the standard scheduling theory, then the simplest implementation ever, that we use in our repository. As usual, some questions are asked. And I'm serious about those, as usual.
Note:The scheduler as shown in the slides
calls t->job instead of best->job.
This is now fixed, and it was not the bug I referred to, which is more
subtle.
The third video of this set is about the implementation of udelay, in a way that is much better than counting microseconds. This is actually the state of the art -- but I may leave some subtle bugs at this point (nothing blocking, just minor details). If the thing is not completely clear at a first view, please consider relying on the commit message rather than the video.
The repository now includes a number of features more: the timestamp_get functionality, sscanf and an interactive shell. So we can finally play with hardware (the shell can read and write all machine registers, and the gpio command allows reading and writing bits.
So we now move to I2C and SPI, the most important peripheral busses in the microcontroller world.
We are now introducing interrupts. A single-interrupt TDC implementation is already pushed in the project's repository.
We now cover two more communication busses: USB and OneWire. The former is known to most, and is supported by our TDC board, which can act as a USB slave device. The latter cannot be demonstrated on real hardware (unless we plug a thermometer in the UEXT connector) but is interesting nonetheless.
It's high time to introduce lists and trees. I'm more interested in lists than in trees, considering the small environment of the microcontroller world.
We have slides and two videos, but first of all the article about lists and treees (in Italian, I'm sorry) and the related source code. The subject matter is the Linux kernel, but the target is picking lists (and trees) from there to use them elsewhere. Please stay reassured, I'm not the only one who did it. This approach to data structures is already in use by some real programmers.
The three videos basically describe the commits that lead to the
"lesson-17" tag in the hsw2020 repository. And there is
a new set of questions.
Here below you find a playlist with the three videos of lesson 17. The size of the frame is exactly the size of the virtual screen I recorded, so it should be "as good as possible". Blurring is due to compression.
When and how to configure, and when and how to error out. Some of this was already hinted-at previously, it's now all together. Part of this is opinions, you are allowed to disagree and argue about it.
Here below you find a playlist with the two videos.
The first thing here is a description of the commits that lead to a simple fix in the initcall implementation. The main point is how to setup your commits so the users are happy. The fix itself is trivial, after the preparing commits are there.
Then we talk about malloc. I am always against having malloc/free in microcontroller systems, because they awake the "out of memory" risk. Still, there are some corner cases where it might be useful, so I take it as an excuse to show use of <list.h>.
Unfortunately, list insertion and removal is not atomic, so we need a mutual-exclusion primitive if the system allows preemption (and our does). So first we need to introduce a mutex, and this is the simplest possible, with the downside that a task can only take one mutex (expanding the code to support several mutexes is left as an exercise for the reader).
The resulting malloc code is 720 bytes, including initialization and some extra-check that might be removed, so it might make sense to use, sometimes. Performace-wise, on this 48mHz microcontroller, it takes something like 12 microseconds to allocate and 5 to free.
Finally, we introduce the subject of random and pseudo-random numbers, and important topic that is often ignored. No, I'm not a cryptologist, the implementation here is really basic, but sufficient for most uses. We even have an hardware random number generator to be added to all microcontrollers that lack it, at the cost of one cent.
No slides this time, only commits and a guy discussing them.
Lesson 21 was mainly a review of function pointers, with no slides nor videos: we did it as an interactive-only session.
We reviewed the irq_request() implementation, which is
one of typical use cases of function pointers. There, we have an array
of possible implementations, and the right one is called by accessing
an array of function pointers. The same approach is sometimes useful to
demangle a switch() construct, for example in the back-end
of a state machine.
We then looked at how we could implement the concept of alternate device drivers by using an "operations" structures, where the function pointers are, in a way, the methods that act on the object.
The commits in branch "lesson-21" (which will become a tag within
master) first add two different implementations of a bit-banging I2C
driver, and then in the last commit show use of a set
of i2c_operations to unify the higher level interface and
allow the application a choice of which driver to use. Adding a driver
for the microcontroller-specific logic cell is now trivial.
Networking. The code is committed, and here is some description of the reasoning behind it.
We are mainly talking about hardware here. I also covered licensing in the lesson.
No videos (or not yet, I must think about it). Slides only.
This is the last lesson, and we talk about debugging. In the code repository you find a d working gdb stub, and the commit messages describe what works and what does not work. I find it quite satisfactory, considering the time it costed.
The slides describe the various aspects of debugging (well, more can be said, but time is limited). And the videos cover the slides and the gdb stub example.
The exam happens on the official dates (time TBD). The exam session lasts 2 hours, and you are asked to work on 4 questions and 2 exercises. You'll be able to choose your questions and exercises among a set of them.
In the questions, you are expected to describe with your own words one technical point. Answers must be as tidy and to the point as possible (i.e., no handwaving). You choose your questions, you must know the answer. Expected time span: 5-10m per question.
The technical exercises are serious problems. You must make your design choices and write the code. The complete, "perfect", solution would take 4-12 hours, while you have 40-50 minutes for each exercise. If you think it's done in 20 minutes, it is not, please proceed further. You are expected to split your time among the two exercises and use it all to deliver the best code and documentation you can.
If what you deliver does not work, do not despair. The problems take more than 40m each to be solved, and I know it. This is what I value in the deliverable (nothing new, if you attended to my classes):
You are asked to keep the camera on so I see you: you are not expected to talk. No other surveillance is there (I do not spy your screen). Yes, you can look for information whenever you want; you are just not expected to talk. And no, you are not expected to look at the conference tab in the browser. If I have something to communicate, I'll talk to all of you in the conference (or write something and then get your attention by talking).
If anything is unclear, or if you encounter problems during development, please make a phone call and we sort it out as quickly as possible, yes, you are expected to talk during the phone call with me.
If I suspect your exam is not yours, we'll have an oral session. It only happened once in past years, I'm confident it won't be needed.
To get the minimum positive grade, you must give almost-right answers to all the questions you choose and show you are able to approach both exercises you choose. From that to the maximum grade, the evaluation is split equally among questions and exercises. To get "cum laude", you must side a good exam session with a good project work.
As already hinted since time 0, in addition to the exam in the official dates, you are expected to deliver a programming work (possibly with some simple circuit design too). I am expected to be queried during development, so please do not follow wrong or uncertain paths without asking: your time is as valuable as mine, and you should not waste a day because you are shy in making a phone call or write me your doubts. If my phone is not responding, please email or send a message to my data number, and I'll get back to you.
This is a list of suggestions for the project work. You can pick one or make your own proposal: I'll most likely accept it.